Not sure how to start using this sophisticated construction estimating system? Don't worry! You're in the perfect place. This quick start guide will help you bid smarter and become an expert in Estimating Link.
Step 1 - Create a Blank Project
When you first launch Estimating Link, you'll see the tree view where you can navigate to recent or classified projects.
To start a new project, go to File > Create New > Blank Project:
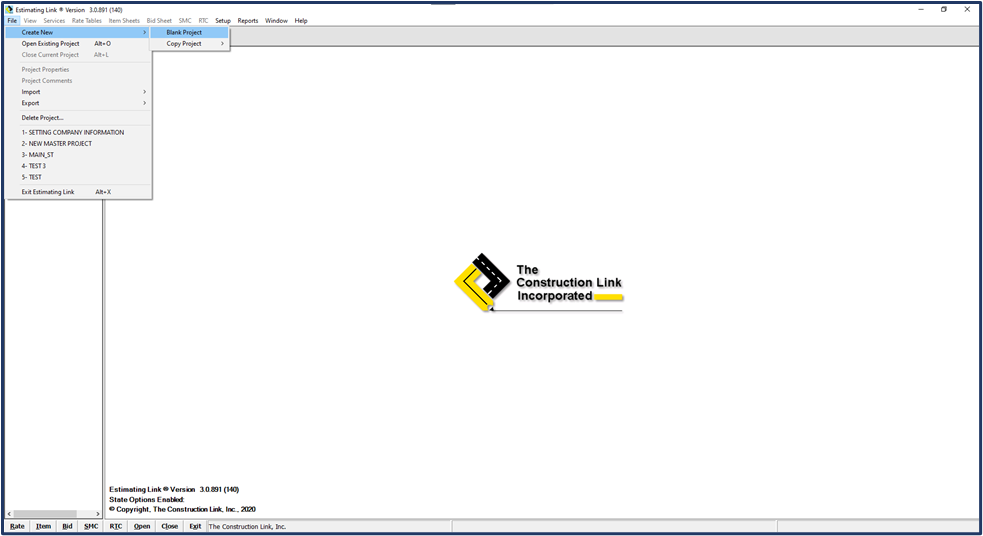
💡Tip: You can start new projects in multiple ways. You can start from scratch (example we'll use in this article), copy a project, import a project using our Electronic Bidding System (EBS) Integration, or use the spreadsheet import wizard (to import from excel)
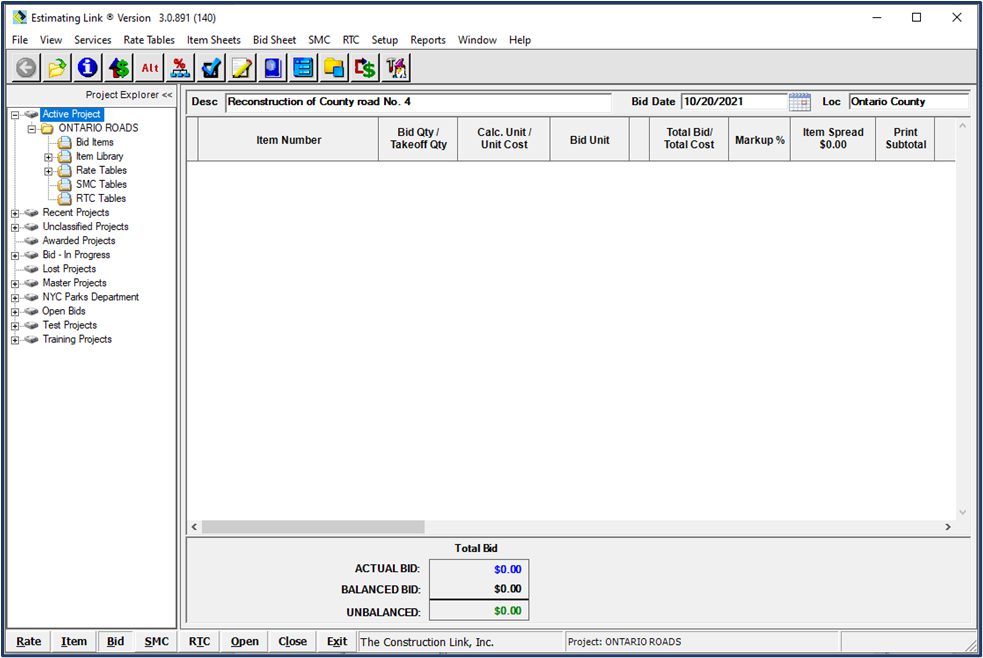
A Project Properties window will be displayed with the General tab selected. Enter your information here (minimal required entry is "Project Name"):

Press OK at the bottom of the window. The Active Project will now be open and shown on the Bid Sheet module of the program. Now you can create Items (Projects Tasks) for your Bid.
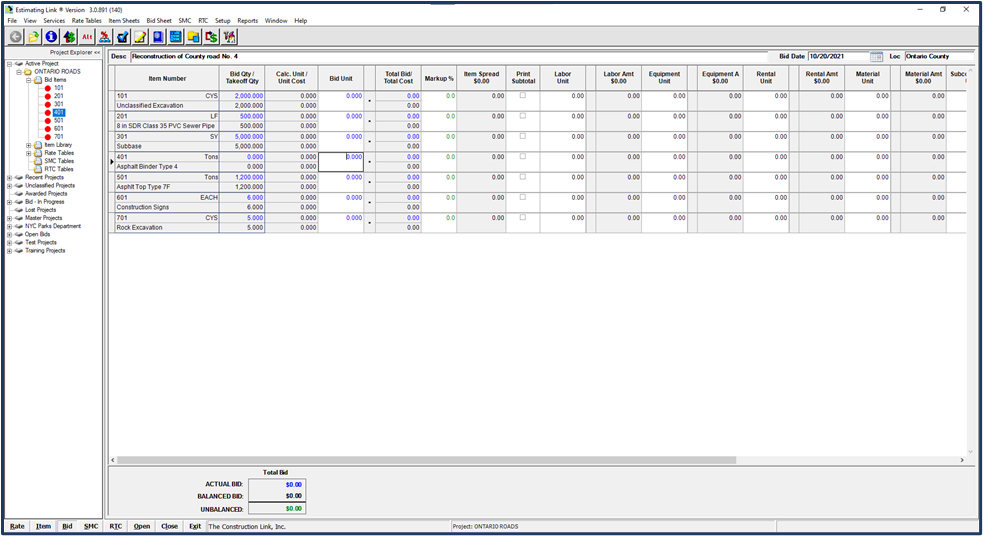
Step 2: Add Items to the Bid Sheet
Create your Items Manually to the Bid Sheet.
- Go to Services >New Item > Add New Item
- Click on the paper and pencil icon
 at the top of the module.
💡Tip: You can also add Items to your Bid Sheet by adding from the Item Library, Importing Items from another project, Importing from Catalogs, building an Item in the Item Sheet first and then adding to the Bid Sheet, or using the Build Wizard.
The Add Bid Item window will be displayed.
- Add the Item number or word, Unit of Measure, Bid Quantity and Description for each of the Primary Items your client needs Unit Prices for.
- Click Apply to add it to the Bid sheet and then enter the information for your next Item. Each new Item will be added to the Bid Sheet.
- Close the window or click cancel when finished.

🗒️Note: Items are added to the Bid Sheet in the order that you add them. To add an Item in between two other Items, select the Item you want to insert it above, right click on that Item and select Insert Item or go to Services > New Items > Insert a New Item.
When you've finished adding your Primary Items to the Bid Sheet, your Bid Sheet will look like this:
Step 3: Import your Rate Tables
When you create a blank project, it does not have any rates/resources in it. If you already have your Master Rate Table built, you can easily import all your rates into your project.
💡Tip: To learn how to build your Master Rate Tables, check out our Beginner's Bootcamp Tutorial. The first 35 minutes provides a step-by-step tutorial on creating Master Rates.
If you don't have your own Master Rate Table built yet, you can use the rates from the sample project, MAIN_ST. (included with your program).
To import either your Master Rate Tables or the Main St. Rate Tables, go to the Rate Tables module of the program by clicking Rate Tables in the menu options at the top of the page.
Then, go to Services > Import > All:

Select either your Master Rates or the Main St. Sample Project from the Project Window.
You will now have rates populated in your current project's Rate Tables.
🗒️Note: Rate Tables can be populated with an endless amount of rates and resources in your current project. They are only used on your current project when you assign costs to them.
Step 4: Add Rates to your Items/Project Tasks
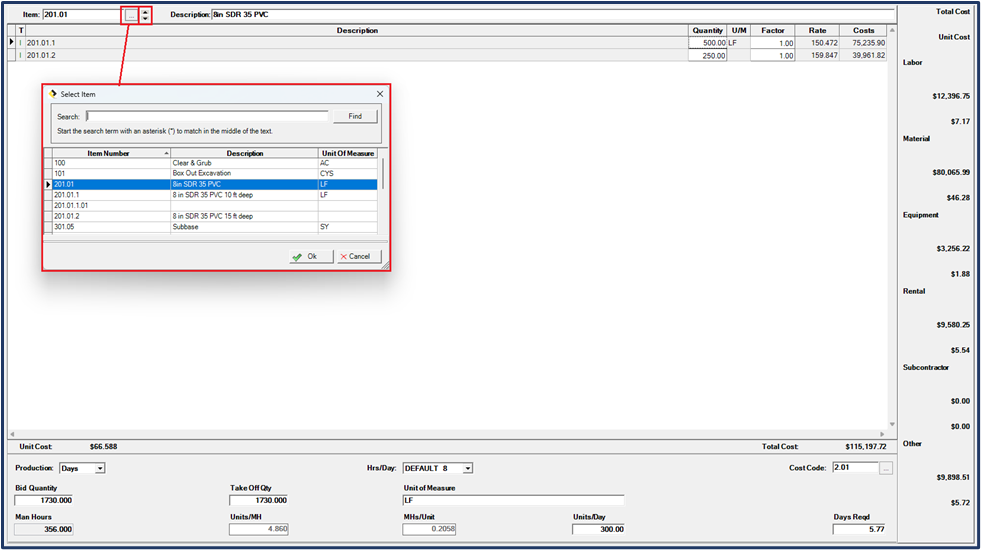
The Item Sheet module of the program is where you add rates and production to your Items. There are numerous ways to get to the Item Sheet of an Item:
- Double click on the Item on the Bid Sheet
- In the Tree View click Item Library > Bid Items > select your Item
- Click on Item Sheets in the top navigation bar (brings you to selected Item)
- Click on Item in the bottom navigation bar (brings you to selected Item)
🗒️Note: When you are in the Item Sheet, the Tree View to the left of the window will highlight the Item you are currently workin on in blue.
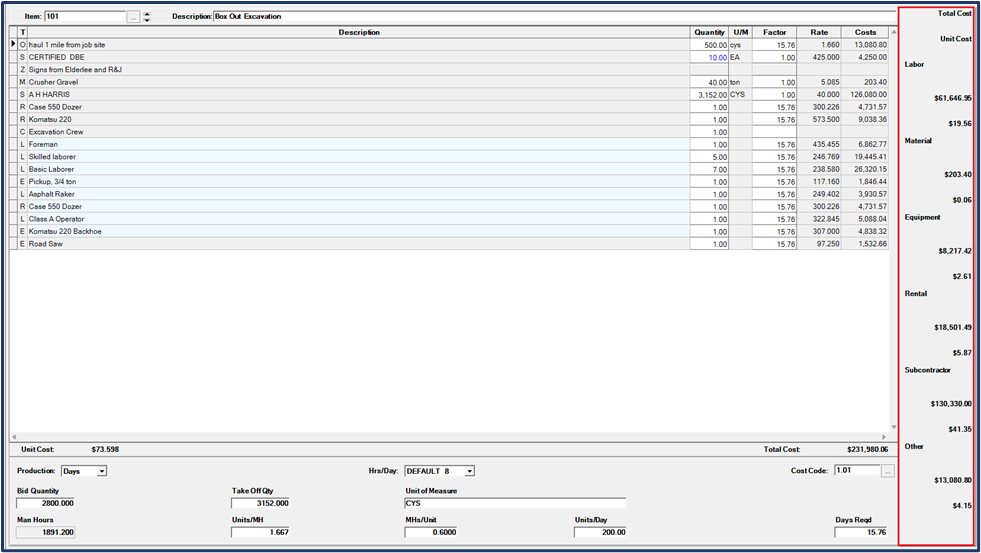
Understand the Item Sheet Window Pane
The Item Sheet is divided into three sections.
- Rate/Resource Section: This section is the main window in the center of the Item Sheet. This section displays the Rates/Resources that are required to complete the Item/Project Task. It also displays the Unit Cost and Total Cost for the Item.
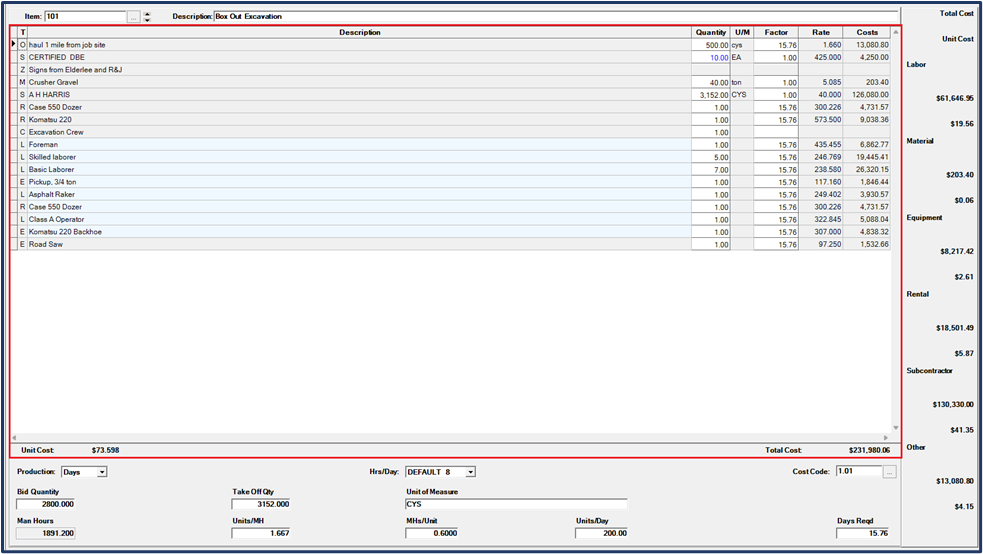
- Production Section: This is the gray section at the bottom of the screen. This is where you enter your production for the Item/Project Task.
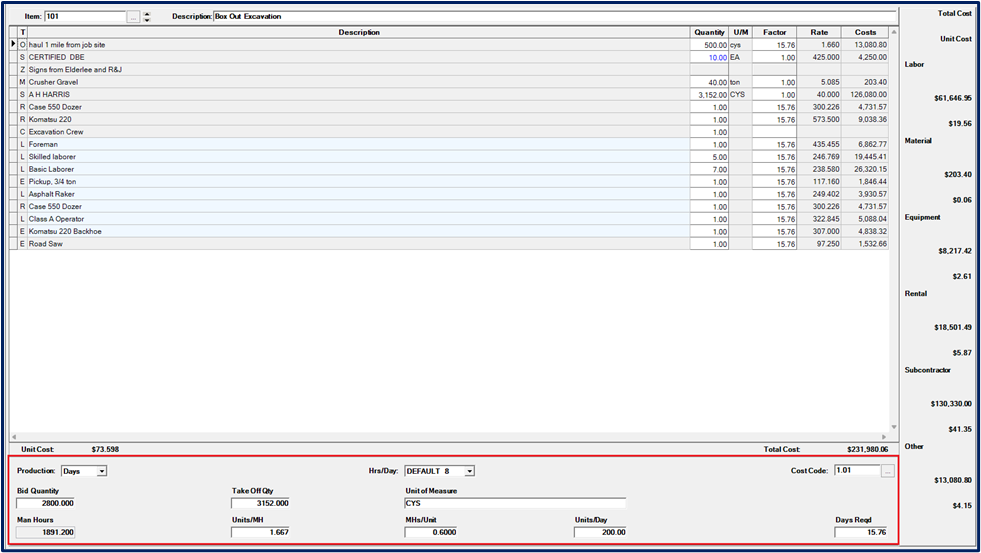
- Rate/Resource Breakdown Section: This is the gray section to the right of the Item Sheet and displays the Unit Cost and Total Cost for each of the Rate/Resource types used.
Add Cost from Rate Table
You can add costs from your Rate Table to your current Item in a number of ways:
- Click the Rate Table icon

- Go to Services > Add Cost from Library
- Right click anywhere in the center portion of the Item Sheet and select Add Cost. An Append a Cost window will be displayed. Select Library Cost and click OK.
Your Rate Library Window will now be displayed containing all the rates from your Rate Table:

Within the Rate Library Window, you can navigate to all your rates by clicking on the Resource tabs at the top.
- To insert a cost with a quantity of one, simply double click on that cost.
- To insert a cost with a quantity other than one, place your curser in the respective QTY column, enter the desired quantity and click enter.
🗒️Note: As you add rates from your Rate Library Window, those rates are being added to the Item Sheet. If you already added production to the Item prior to adding costs, each cost would be extended and added to the total cost of the Item.
Finish adding your desired rates from your resource types, then close the Rate Table Window.
Add a Write-In Cost
A Write-In cost is used to add cost to your Item that are not currently in your Rate Library. As you create Write-in costs, you can choose whether or not to add them to your Rate Library.
You can add a Write-In cost the same ways you can add a Rate Table cost:
- Click on the Write-In Cost Icon

OR
- Go to Services > Cost > Add a Write-In Cost
- Right click anywhere in the center portion of the Item Sheet and select Add Cost. An Append a Cost window will be displayed. Select Write-In Cost and click OK.
A Write-In Cost Window will now be displayed:

- Select the correct resource category type at the top.
- If you'd like to add this cost to your Rate Library, keep the check next to Add Entry to Rate Library.
🗒️Note: When you add the entry to the rate library, it is only adding it to the rate library for the specific project you are working on.
- Add a Code, Description, Quantity, Factor, Rate, and other desired fields.
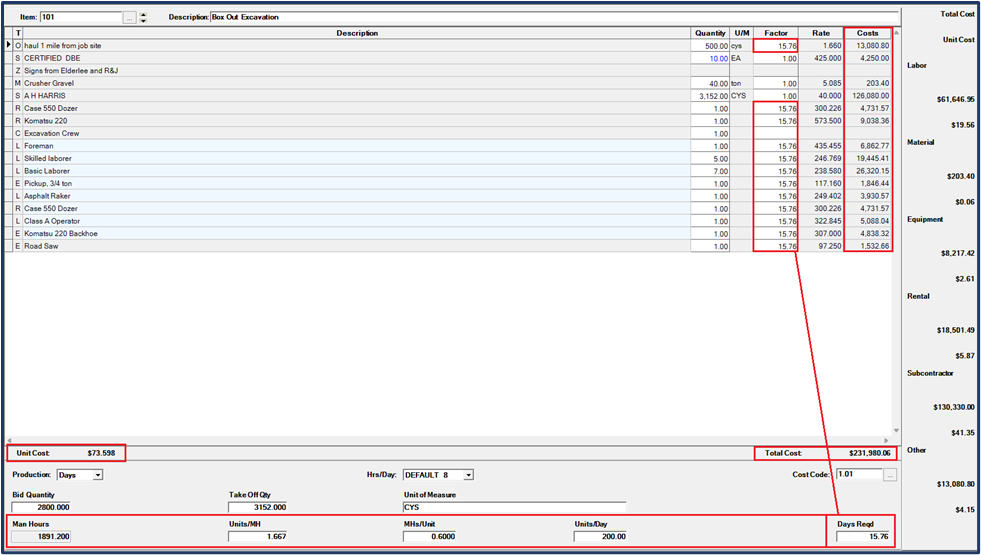
Step 5: Add Production to your Item
You can enter production at any time during the building of Item costs.
Production can be entered in either Days or Hours. The choice can be made for each item.
💡Tip: Default Production can be designated in your Setup Options under the "Item Sheets" Tab. You can set the default to days or hours depending on how you typically calculate production, but this can be always be changed item to item.

After you select Days or Hours, the program now gives you four ways to enter production:
- Units/MH (manhour)
- MHs/Unit
- Units/Day or Units/Hr
- Days Reqd./Hours Reqd.
All four options are connected to each other and will automatically calculate together based on your entry. It will also automatically calculate your total Manhours for the Item, as well as your extended cost for all your labor and equipment resource types.
Step 6: Finish Building All your Items
All the Items inside your Bid can now be built in this same fashion. Use the navigation at the top of the Item Sheet Window to move through the different Items in the Bid. You can use the up and down arrows to move sequentially from one item to the next, or use the three dots next to the item number to navigate to the item you want to work on. This is especially helpful when you are working on a bid with a large amount of items/tasks.
💡Tip: The Green Arrow Icon ![]() takes you back to the last screen/module of the program you were in.
takes you back to the last screen/module of the program you were in.
Step 7: Add Markup, Overhead, Profit, and Bonds
After you have built all your Bid Items with cost, you're ready to add markup, overhead, profit, and bonds to your project.
On the Bid Sheet module of the program, access the Markup Summary window:
- Click the Markup Summary Icon

- View > Markup > Summary Total
The Markup Summary Window will now be displayed:

Markup
Markup of direct job cost can be entered by putting a percentage or total dollar amount for each resource. The "Total" and "Pct" columns to the right provide the calculations of direct cost for each resource to help understand, analyze, and determine the right amount of markup for each category.
Overhead
Project Overhead can be entered in two different ways:
- Project Overhead from Table
- Project Overhead % or LS
To add overhead as a percent or lump sum amount, simply add the totals in that space. Adding a percent or lump sum will automatically calculate the other entry box.

To add Project Overhead from a Budget List, click on the Overhead button at the top of the markup summary.

The Job Overhead Table Window will be displayed:

The Overhead List is completely customizable and creates a Budget for Overhead. The total is then added to the Overhead calculations on the Markup Summary. You can also add deductions to this list, if required.
💡Tip: Save your Overhead Budget in your Master Rates Template and import it with your Rate Tables. You can modify it to suit your current project.
To add a new cost to your Overhead Table:
- Use the Add or Insert button on the bottom of the window (you can also right click to add or insert). The Add button adds the budget item to the bottom of the list. The Insert button inserts the budget item where you place your cursor.
- Enter the description, quantity, multiplier and rate. The total for all overhead budget items will be totaled at the bottom of the table.
- Once the costs are added to the Overhead Table, press Close. You will see the total for the overhead budget items beside Project Overhead from Table in the Markup Summary.

Corporate Overhead
Corporate Overhead is synonymous with G&A, or General and Administrative Expenses. This can be entered in either a percent or lump sum amount and is added to the Project Direct Cost Total.
💡Tip: To learn more about the differences between overhead and corporate overhead/G&A costs, read our blog here.
Net Profit
Profit can be entered in either a percent or lump sum amount and is added to the Project's Direct Cost Total.
Taxes-Add On-Deducts
This can be used for any additional taxes, add-ons, or deductions on a project. This can be added as a percent or lump sum amount and is added to the Project's Direct Cost Total.
⚠️Caution: When using this as a tax calculation, this takes the total of the direct job costs across all category types and spreads the total proportionately to each bid item. If you want to calculate tax on only certain cost types, use the tax calculations inside the rate tables.
Bond
If a Bond is required for the project, it can be calculated by checking the Bond box on the
Markup Summary Window.
You can add and/or modify your Bond cost by accessing the Bond Summary Window in one of two ways :
- In the Markup Summary Window click

OR
- On the Bid Sheet, select View > Markup > Bond Table
The Bond Summary Window will now be displayed:

- Here you can enter any bond information. This information is typically provided by your Bonding Company.
- When you are done entering the information, press theDone.
- The Bond Calculator will automatically calculate the cost of the bond based on the size of the project and add the cost to your Markup Summary.
💡Tip: The Bond Calculator can saved to your Master Rate Tables and imported from project to project.
Indirect Item
You can also spread cost to select Bid Items using the Indirect Item. To access the Indirect Item use one of the following ways:
- On the Markup Summary Window, click
OR
- On the Bid Sheet, select View > Markup > Indirect Item
- On the Tree View, select Item Library > INDIRECT
This displays a special Item which allows the user to spread costs to selected Bid Items in
proportion to the cost of each item.
The Indirect Item is the only item that has a post button in the lower right hand corner. Click the Post button and the Indirect Item Window will be displayed:

The Indirect Item Window shows Bid Items with the percentage of the Indirect Item total cost that will be spread to each Bid Item. By default, the percentage is the proportionate total of each item to the total bid.
You can manually override the percentages by clicking in the percentage box beside each item and changing the spread total. You cannot post your indirect item unless the total spread equals 100%.
Once your indirect item percentage spreads are set, Click Post within the window to post the amount calculated to each Bid Item.
💡Tip: To learn more about the indirect items feature, click here.
Step 8: Round your Bid and Prepare your Proposal
Round your Bid
The final step before presenting your bid to your customer is to round your bid. You have the option to round to the dollar, dime, penny, or half penny. You can set your rounding designation by going to Setup>Options>Bid Sheet>Round Bid Unit to:
0=dollar
1=dime
2=penny
3=half penny
Click Here for Instructions on Rounding your Bid
Prepare your Proposal
To create a proposal after rounding your bid, go to Reports>Bid Sheet>Proposal. Select the proposal that fits best for the presentation to the customer.
Click Here for more information on customizing your proposal settings
Click Here for examples of our Proposal Templates
Congratulations! You've completed your first bid!
If you need help or have questions while getting started in creating your first bid, you can always reach out to us by phone at 800-448-0741 or email us at support@tcli.com.
We love to help!