The Spreadsheet Export Wizard feature in Estimating Link gives you the ability to export 32 fields on the Bid Sheet, include Sub-Items and/or Sections, remap and relabel fields, and save your various mapping profiles to be used again.
Data that can be Exported
Here is a list of the data that can be exported to a spreadsheet. Each data point will be exported into a column in the spreadsheet.
| Item Number | Material Total Cost |
| Item Description | Subcontract Unit Cost |
| Item Unit of Measure | Subcontract Total Cost |
| Takeoff Quantity | Other Unit Cost |
| Bid Quantity | Other Total Cost |
| Unit Cost | Total Cost (Entire Bid) |
| Margin | Cost Code |
| Bid Unit | Cost Code Description |
| Total Bid | User 1 (User Defined Field) |
| Profit/Loss | Day/Hrs Required (Total Production) |
| Labor Unit Cost | Days/Hrs (Production Value) |
| Labor Total Cost | Units/Day |
| Equipment Unit Cost | MH/Unit |
| Equipment Total Cost | Man Hours |
| Rental Unit Cost | Equipment Hours |
| Rental Total Cost | Rental Hours |
| Material Unit Cost | Hrs/Day (8,10, 12, etc) |
Access Spreadsheet Export Wizard
In Estimating Link, open the project that you want to create an Excel spreadsheet for.
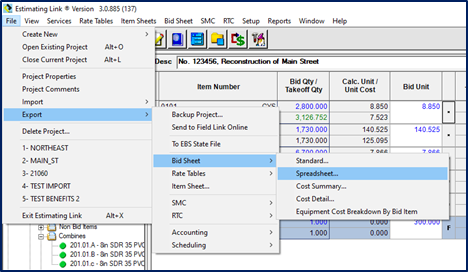
Click on File > Export > Bid Sheet > Spreadsheet:
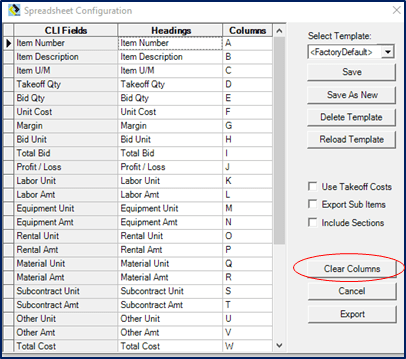
The Spreadsheet Configuration window will now be displayed as shown below:

If you don't need to make any changes, you can quickly export to a spreadsheet by clicking Export.
Mapping Fields
You can make changes so your spreadsheet is created in the order you want, with the labels you want, and the fields you want to include.
- The first column on the Spreadsheet Configuration window labeled CLI Fields is what that field is referred to in Estimating Link.
- The second column is what your column will be labeled on your spreadsheet. By default, it is populated with Estimating Link's nomenclature but you can change this by placing your curser in the appropriate cell and changing it to what you would like.
- The Third column corresponds to your columns in your spreadsheet. By default, it is in ascending order but you can change the columns by placing your curser in the appropriate cell and changing it to the column you'd like.
Clear Columns
You can clear all the cells in the Columns column so you are only exporting the fields you want and in the order you want.
Click on the Clear Columns to start fresh:
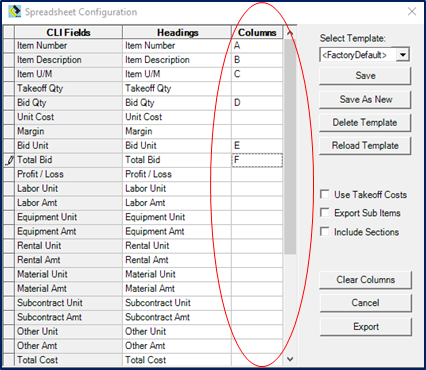
Now, you can map the Estimating Link fields to your spreadsheet fields. In the below illustration, we are mapping the Item Number to column A in excel, the Item Description to column B, and so on:
Mapping Profile Templates
Open Template - Select which previously saved template you would like to open by using the drop down arrow under Select Template and select the template you'd like to use:

Save As New - If you would like to save a template so you can use it again, click Save as New. A new window will be displayed asking you to Enter New Template Name. Enter the name, click Ok and another window will let you know that the template has been saved successfully.
Save - If you would like to save modifications made to a previous saved template, first open that template, make your changes and click Save.
Reload Template - Selecting Reload Template, reverts your changes and loads the saved Template again.
Use Takeoff Costs
If you would like to use your Total Bid to be calculated using your Takeoff Costs, add a checkmark to Use Takeoff Costs:
![]()
Export Sub-Items
You also have the option to include your Sub-Level Items (child Items). By default the Spreadsheet Configuration Wizard has this unchecked but you can add a checkmark into Export Sub Items to include your Sub-Level Items in your Export.
![]()
Include Sections
If you would like to include the Sections you created on the Bid Sheet.
![]()
Export to Excel
Click the Export button, select the desired location and/or folder you would like to save the file to and click Save.
You will receive a success message notifying you that it has been exported, saved, and the location it was saved to:

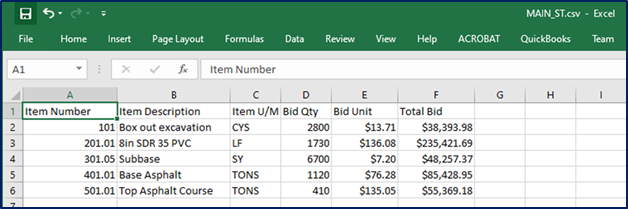
Now, you can open your saved file in Excel by double clicking on it in the folder you saved it to or select your file, right click on it and select Open with > Excel:

Your new Excel report should look like this: