In this article, we will cover:
- Quickbooks Software Setup to accept Imports from Estimating Link
- Field Link Software Setup for proper export to Quickbooks
- Preparing your Field Link Timesheets for Export
- Importing your Field Link timesheets to Quickbooks
Prerequisites
- User must have permissions to access the Accounting functionalities within Field Link (FL)
- QuickBooks Contractor Edition Desktop must be QB 2007 & Enterprise 7.0 or later
- Employee information must be setup in Field Link. See this article for setting up employees in Field Link.
- First and Last Name must match the employee first and last name in Quickbooks. This article will explain proper employee setup in Quickbooks.
Important Notes before Starting
- Test Importing - Create a new, empty company file with which to practice and test importing sample files.
- QuickBooks uses Intuit Interchange Format (IIF) to import transactions and lists.
- There is no preventative mechanism to stop the same IIF from being imported multiple times.
- Create a backup of your data file BEFORE importing into a live QuickBooks company.
- Be sure that all the list elements pertaining to your transactions (accounts, customers, vendors, etc.) are already in your company file.
- If you'd like to connect your Estimating Link program to your Quickbooks software, click here for step-by-step instructions.
Quickbooks Setup
Set Payroll Preferences
- The Field Link export to QuickBooks uses employees' first name first.
- To verify this setting is correct in Quickbooks, go to Edit>Preferences and navigate to "Payroll & Employees" on the left navigation bar.

Set up your Employees and Payroll Items
- Go to Employees>Employee Center.
- For new employees, read on. for existing employees, click to the next section.
New Employees
- To set up a New Employee, Click "New Employee"
- Enter your Employee's Personal Information, then tab to "Payroll Info" on the left navigation bar.

- Set Payroll Schedule to Weekly or Biweekly.
- Click in the blank space under Item Name, and Click "Add New".

- Set Wages to Hourly Wages and click Next.

- Set Wages as Regular Pay and click Next.
- Enter the Name for the hourly Item. IMPORTANT: This must be listed exactly as Straight Time.
⚠️Warning: Quickbooks is very particular about names and codes. Please ensure you type "Straight Time" exactly as you see it here.

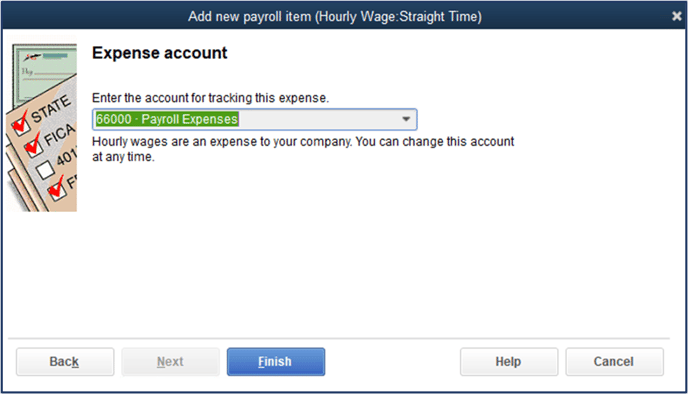
- Enter the Account for tracking the expense. By Default, Quickbooks selects the Payroll Expense account. Click Finish.
- Input the hourly rate for the employee.

- Check the Box Use time data to create paychecks.

- Perform these same steps to add Overtime as an Item. IMPORTANT: The name of the item must be exactly "Overtime".

- Once you have finished inputting your employee information as needed, click OK.
Existing Employees
- Go to Employees>Employee Center.
- Your Employees will be listed in the main window.
- To edit an existing employee, right click on the employee name, and click Edit Employee.

- Navigate to the Payroll Info Tab
- Click in the blank space under Item Name, and Click "Add New". Note: There may already be existing payroll items listed. You will need to follow this procedure to connect Quickbooks to Field Link
- Set Wages to Hourly Wages and click Next.
- Set Wages as Regular Pay and click Next.
⚠️Warning: Quickbooks is very particular about names and codes. Please ensure you type "Straight Time" exactly as you see it here.
- Input the hourly rate for the employee.
- Check the Box Use time data to create paychecks.

- Enter the Account for tracking the expense. By Default, Quickbooks selects the Payroll Expense account. Click Finish.
- Perform these same steps to add Overtime as an Item. IMPORTANT: The name of the item must be exactly "Overtime".
- Once you have finished inputting your employee information as needed, click OK.
Field Link Setup
- Log into Field Link.
⚠️Caution: You must have proper admin and payroll permissions in Field Link to perform this setup.
- Go to Admin > System Options. The System Options will now be displayed as shown below:

Set Payroll System
While on the System Options, change Payroll System to QuickBooks Desktop by clicking the down arrow in the field and selecting QuickBooks Desktop:
![]()
Click Submit:
![]()
You should now see Options Save in red at the top of your System Options:
![]()
Prepare your Timesheets to Import to Quickbooks
- On the main navigation in Field Link, click on Accounting. The Accounting Interfaces will now be displayed:

Week Ending
- You can change the Week ending by clicking on the date:
![]()
- The Select Processing Week popup window will now be displayed:

- Click the down arrow to select your desired date range and click Submit.
- Your Week Ending should now show the correct date.
Payroll Report
- Click on Payroll Report to view a the payroll report for the specified date range. The Payroll Report will open in another window:
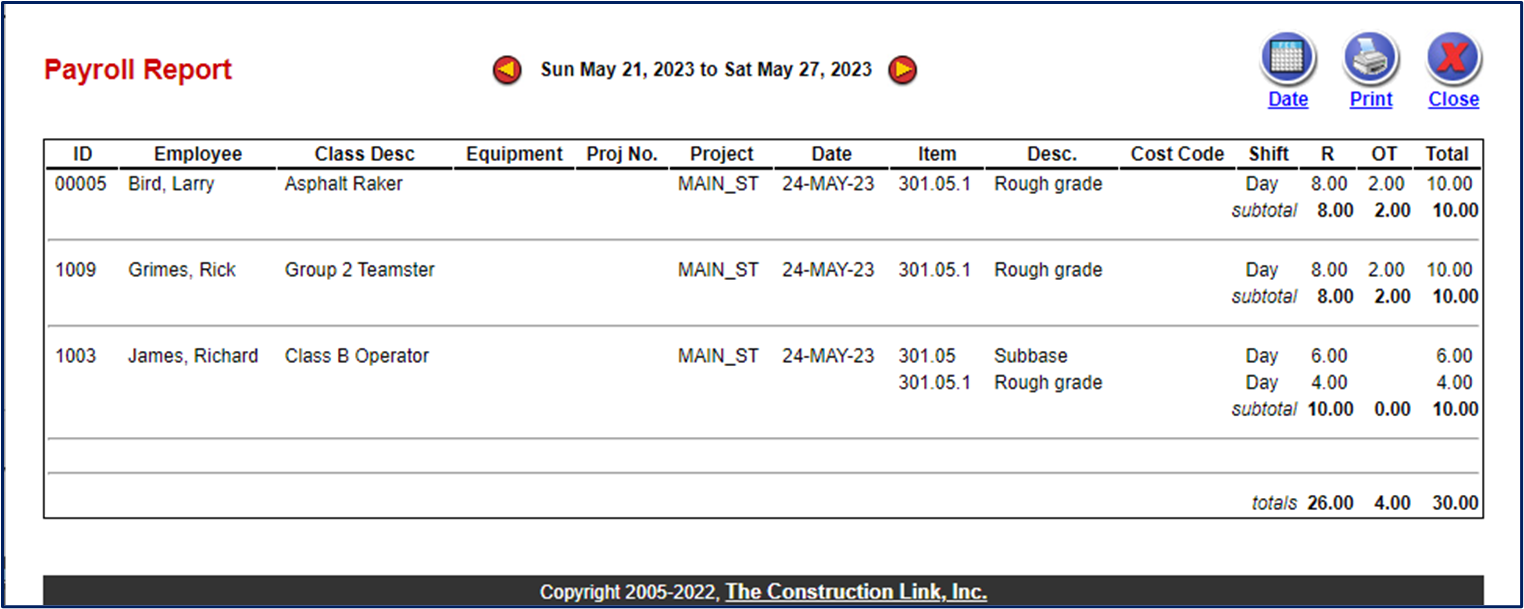
- On the Payroll Report window, you can navigate to different date ranges, change the date, print or close.
Preview Payroll Data File
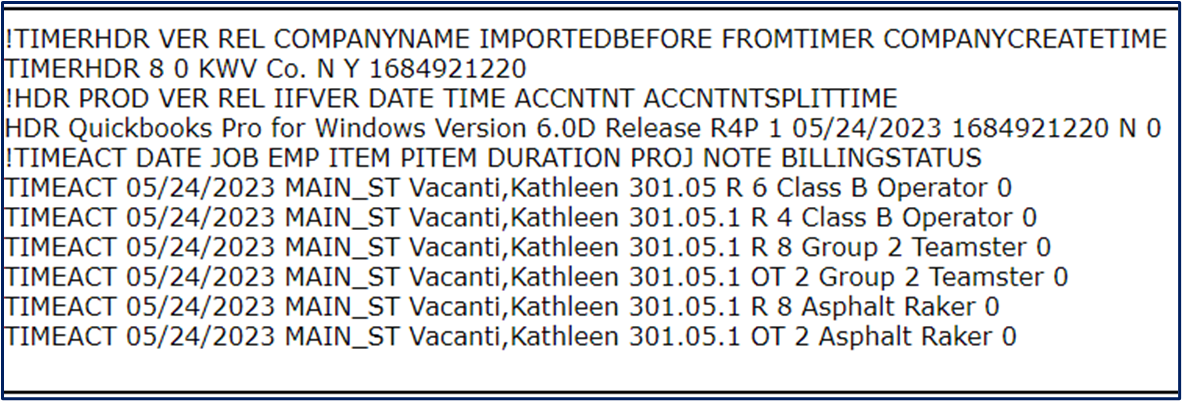
- The preview of the Payroll data file is a display of the comma delimited file (CSV) which will be created for your accounting system to interface with.
Transfer Data to Payroll System
- Transfer Data to Payroll System will create a file in the format that QuickBooks needs for the import. To save the files, click Transfer Data to Payroll System. A confirmation popup window will appear:

- Click OK.
🗒️Note: Depending on your Field Link settings, clicking OK will lock the timesheets so users cannot edit or add timesheets within this payroll period.
- Your Payroll Data will now download as a Payroll.iif file. Save the file to your desired location and consider renaming it with the payroll period.
Import your Timesheets to QuickBooks
- In Quickbooks, go to File>Utilities>Import>IIF Files

- Click Import IIF.

- Navigate to the Payroll File that was downloaded from Field Link, and click Open.

- Quickbooks will display this message:

- If the file imported successfully, this message will be displayed:

- If the file did not import successfully, this message will be displayed:

- Click on Review Now to review the reasons for the failed import, fix the issues, and try again.
If you need help with setup of your Quickbooks Integration, please call our friendly support team at 800-448-0741 or email support@tcli.com.