
Easily import Items & Rates from spreadsheets into Estimating Link. Step by step directions with screenshots and downloadable templates.
In this Article:
- Overview
- Preparing your Spreadsheets
- CSV Requirements
- How to Use the Import Wizard
- Additional Options for Importing Data
- Using Import Profiles
Overview
The Spreadsheet Import Wizard is a feature within Estimating Link that allows you to import
data from CSV files into either the Rate Tables or Item Sheets. The format of the CSV file is flexible, and you can choose what columns in the file will be mapped to fields within
Estimating Link.
You also have the ability to save these mappings to a profile so it can easily be re-used later when importing a similar file.
The Spreadsheet Wizard is found under the menu File > Import > Spreadsheet Import Wizard:

Preparing your Item Spreadsheets - Import Fields and Templates
The following is a list of Item data from Spreadsheets that can be imported into Estimating Link.
➡️ CLICK HERE TO DOWNLOAD THE ITEM IMPORT TEMPLATE
💡Tip: Fields do not need to be in any specific column order. This list contains the available fields that can be imported. Not all fields are required to be imported.
|
Data Field |
Description | Field Type/ Requirements |
| Line Number | Line Sequence # | Numeric |
| Item Number | Number of Item/Task | Text, 25 max characters |
| Description | Description of the Item | Text, 120 max characters |
| Unit of Measure | The Item's Unit of Measure i.e. CYS, LF, TONS, etc. | Text, 25 max characters |
| Cost Code | Accounting Cost Code | Text, 25 max characters |
| Bid Quantity | Bid Quantity of Item | Numeric |
| Take Off Quantity | Take Off Quantity of Item | Numeric |
| Production | Numeric | Numeric |
| Days Required | Numeric | Numeric |
| Item User 1 | Item Sheet User Defined Field | Text, 25 max characters |
| Bid Unit | Unit Price of Bid Item (when adding to Bid Sheet) | Numeric |
| Markup Percent | Markup % when adding to Bid Sheet | Percentage number |
| Bid User 1 | Bid Sheet User Defined Field | Text, 25 max characters |
Preparing your Rate Spreadsheets - Import Fields and Templates
Rates must be imported individually by resource category. You will need to have separate spreadsheets for Labor, Equipment, Rental, etc.
💡Tip: Fields do not need to be in any specific column order. This list contains the available fields that can be imported. Not all fields are required to be imported.
Labor
➡️ CLICK HERE TO DOWNLOAD THE LABOR IMPORT TEMPLATE
| Data Field | Description | Field Type/ Requirements |
| Rate Code | Unique Code for Labor Rate (i.e. Lab0001) | Alphanumeric, 9 max characters |
| Description | Description of Labor Class (i.e. Foreman) | Text, 60 max characters |
| Base wage | Hourly Base Wage of Labor Class | Dollar amount number |
| FICA | Percentage of Taxes paid on Labor Class | Percent number |
| Worker's Comp. | Percentage WC paid on Labor Class | Percent number |
| Liability | Percentage of General Liability paid on Labor Class | Percent number |
| Other 1 | Additional labor burden % if applicable | Percent number |
| Other 2 | Additional labor burden % if applicable | Percent number |
| Benefits | Hourly Benefits paid to Labor Class | Dollar amount number |
Equipment & Rental
➡️ CLICK HERE TO DOWNLOAD THE EQUIPMENT IMPORT TEMPLATE
💡Tip: Equipment and Rental rates can be entered as both daily or hourly rates. You will have the option to choose during the import.
| Field | Description | Field Type/Requirements | |||
| Rate Code | Unique Code for Equipment Rate (i.e. DOZ0001) | Alphanumeric, 9 max characters | |||
| Description | Description of Equipment | Text, 60 max characters | |||
| Base Rate per Day/Hour | Daily or Hourly rate cost for equipment ("idle time") | Dollar amount number | |||
| Sales Tax Percent | Daily or Hourly Sales Tax percent paid on equipment | Percentage number | |||
| Sales Tax Amount per Day/Hour | Daily or Hourly Sales Tax amount paid on equipment | Dollar Amount number | |||
| Fuel per Day/Hour* | Daily or Hourly Fuel cost of equipment | Dollar Amount number | |||
| Repairs per Day/Hour | Daily or Hourly Repairs paid on equipment | Dollar Amount number | |||
| Insurance per Day/Hour | Daily or Hourly Insurance paid on equipment | Dollar Amount number | |||
| Other per Day/hour | Additional Daily or Hourly cost paid on equipment | Dollar Amount number | |||
| Vendor Code | Vendor Code/Name attached to rental equipment only | Text, 25 max characters. | |||
| Type of Fuel | Type of fuel consumed by equipment (i.e. Diesel) | Text, 9 max characters | |||
|
Number of Gallons* |
number of gallons consumed by equipment daily/hourly | Numeric | |||
| Cost Category Code | Cost Category Code from Estimating Link | Text, 9 max characters (for new codes only) | |||
| User 1 | User Defined Field in Rate | Text, 17 max characters |
* 🗒️Note on Fuel Entries: If you want to use the Fuel Worksheet to calculate Fuel Cost, you can leave the Fuel per Day/Hour Field blank. If you have a set level of consumption for your equipment, use the "Number of Gallons" field to enter consumption. You can then use the Fuel Worksheet and adjust fuel prices only to calculate your total fuel costs.
Material, Subcontractor, and Other Rates
➡️ CLICK HERE TO DOWNLOAD THE RATE TEMPLATE
💡Tip: Fields do not need to be in any specific column order. This list contains the available fields that can be imported. Not all fields are required to be imported.
| Field |
Description |
Field Type/Requirements |
| Rate Code | Unique Code for Rate (i.e. AGGR0001) | Alphanumeric, 9 max characters |
| Description | Description of Rate | Text, 60 max characters |
| Rate | Rate of resource per Unit of Measure | Dollar amount number |
| Unit of Measure | Unit of Measure for Rate | Text, 25 max characters |
| Discount Percent* | Percent of discount on unit price of rate | Percentage number |
| Discount Amount* | Amount of discount on unit price of rate | Dollar amount number |
| Sales Tax Percent* | Percent of tax on unit price of rate | Percentage number |
| Sales Tax Amount* | Amount of tax on unit price of rate | Dollar amount number |
| Vendor Code | Vendor Code/Name attached to the rate | Text, 25 max characters. |
| Temporary Price (Y/N) | Designate if rate is temporary pricing | Y or N |
| Cost Category Code | Rate Category Designation | Text, 9 max characters |
| User 1 | User Defined Field Entry | Text, 17 max characters |
CSV Requirements
The import wizard is fairly flexible, but there are some format requirements that the
CSV file must meet in order for a file to be successfully imported.
Header Row
A header row is an optional line in the CSV that contains a description of the data in each
column.
You will have the option of whether or not the line exists in the file being imported.
- If the header row is present in the file, it must only be one row, and must be the first row in the file.
- If column descriptions are duplicated in other rows within the CSV file, those descriptions will be imported as if they are part of the data.
Required Columns
The individual columns do not need to be in any particular order, but there is at least one required column for each type of data being imported.
- Items - if you are importing Items, a column representing an Item Number must be
present. - Rates - if you are importing Rates, a column for the Rate Code must exist.
⚠️Warning: If the required column does not exist, or you choose not to select it while mapping
columns, you will not be allowed to import the specified file. Any of the other columns
that are not mentioned here, are optional.
How to Use the Spreadsheet Import Wizard
In the following example, we are using the Spreadsheet Import Wizard to Import Items into a New Project. The spreadsheet includes header rows, and all Items will be added to the Bid Sheet.
Here is a screenshot of a spreadsheet that will be imported:

💡Tip: Fields do not need to be in any specific column order. This list contains the available fields that can be imported. Not all fields are required to be imported.
⚠️Warning: If you are importing Cost Codes for your Items, those Cost Codes should match the Cost Codes in your Accounting Software.
Step 1
Save your excel spreadsheet as a comma, delimited file (.CSV).
Close your excel file. You can now use the Spreadsheet Import Wizard to import this project into the Estimating Link.
Step 2
Click on File > Import > Spreadsheet Import Wizard. The Spreadsheet Import Wizard window will now be displayed.
Click on the three dots at the end of the Filename field to bring up the windows explorer:

Select (double click on the file or select it and click open) the Excel file that you saved as a .csv file.

Your selected file will now show up in the Spreadsheet Import Wizard.
Step 3
Select New Project and give it a name. Click Next.

For creating a new project, select Items:

Check both the Data Contains Header Row and Add Items to Bid Sheet:

Click Next.
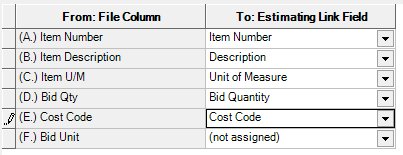
The Setup Column Map displays the Spreadsheet Column header names on the left hand side of the screen.
Click on the first (not assigned) field in the right hand column to display the fields in Estimating Link that correspond to the spreadsheet header field.

Clicking on the down arrow at the end of the Estimating Link field will display the list of fields:

After selecting the respective fields that match the Excel fields, click Next:
You will now be displayed a preview of the project in Estimating Link:

Click Finish to load the new project into the Estimating Link program, click OK on the Import window.
Step 4
Your new project Bid Sheet is now displayed for you to start entering your costs:
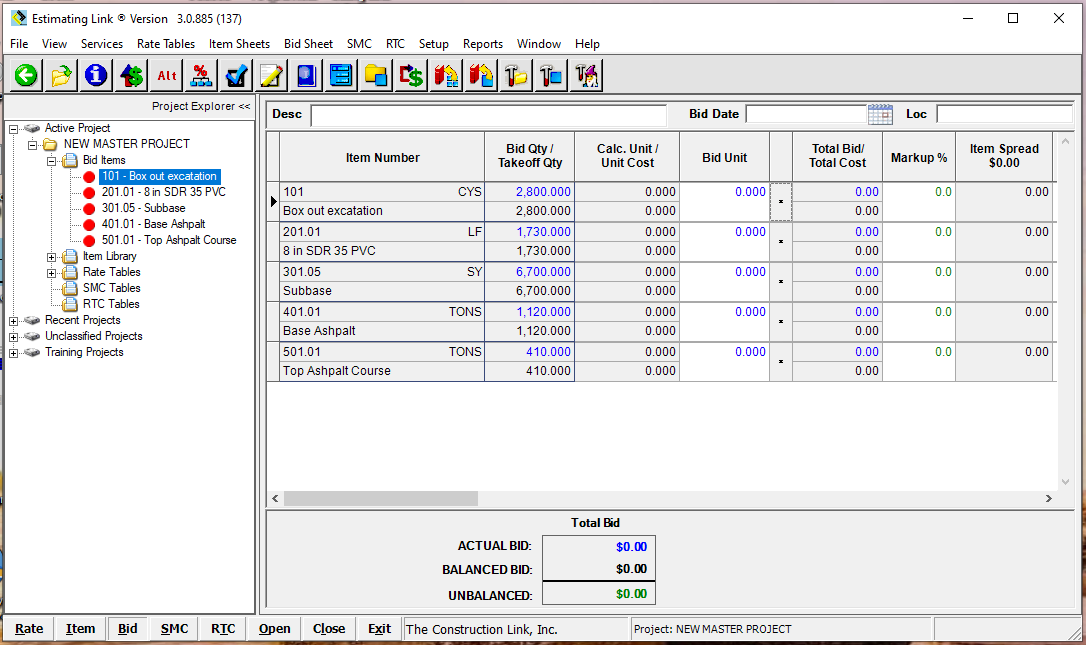
To navigate to an Item on the Bid Sheet, Double Click on the desired Item either in the Project Explorer Tree View or directly on the Item on the Bid Sheet. This will bring you to the Item Sheet of that Item.
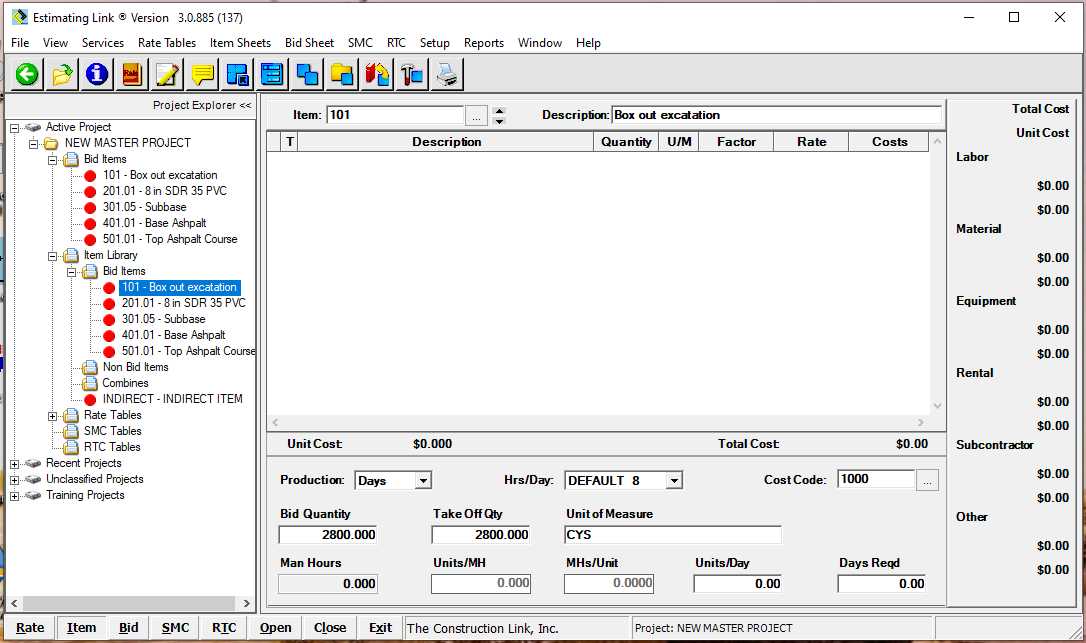
🗒️Note: All the information from the spreadsheet has now been transferred to each item. For additional options for adding items to the bid sheet, click here.
Additional Options for Importing Data
When data from a CSV file is being imported, there are specific rules on how data is interpreted and handled that you should be aware of to effectively use the Spreadsheet Import Wizard.
Updating Existing Data
While setting up the Spreadsheet Import Wizard, there will be an option to Update Existing Data.
- Update Existing Data is checked: Estimating Link will look inside the project you are importing to and identify if a record already exists with the same Rate Code or Item Number (depending on the type of data being imported). If the record exists in Estimating Link, it will be updated with the data being imported.
- Update Existing Data is not checked: Any records that already exist in Estimating Link will be skipped.
💡Tip: Regardless of this option being on or off, any records that do NOT exist in Estimating Link will be added as new records.
🗒️Note: the “Update Existing Data” option will be disabled when importing into a new project since there is not an existing data to update.
Adding Items to the Bid Sheet
When importing Items from a CSV file, you will have the option of adding the items to the Bid Sheet.
For New Project Imports:
If this option is turned on, Items will be added to the Bid Sheet.
🗒️Note: It is recommended to add Items to the Bid Sheet on new projects.
For Existing Project Imports:
If Bid Items already existing on the Existing Project you are importing new bid items into, the import items will appear at the end of the Bid Sheet. Items that are already on the Bid Sheet will be left at their current location regardless of where the item appears in the CSV file.
💡Tip: You can use the Reorder Items and/or Renumber Items Feature under the Bid Sheet Services Menu to Organize your Bid Sheet Items if they are not in the order you want them in.
Using Import Profiles
Profiles are a way of saving options and field mappings in the Spreadsheet Import Wizard to re-use later. This can be useful if you need to repeatedly import the same type of file since you
won’t need to take the time to setup any options.
Saving a Profile
When you get to the last step of the Spreadsheet Import Wizard, there will be a box at the bottom
labeled “Save Profile”.

click the Save Profile box, and enter a profile name.
Click the Finish button to finish the import and save the profile.
The next time you want to the import the same type of file with the same column headings, you can use the saved profile to import, which eliminates the time to column map again. See next section Loading a Profile.
Loading a Profile
After you have saved at least one profile, the next time you run the Spreadsheet Import Wizard, after choosing a target project, you will be prompted to either use an existing profile or to set
the options manually.

If you want to load an existing profile, Select Use an Existing Profile for import options. Under Select Profile, select a saved profile from the dropdown box. This will load all the options and field mappings so you can just click “Next” through the subsequent steps of the wizard.
You will still be taken through the wizard steps for setting options, but they will already
be setup according to the profile that was loaded. This will give you the ability to modify
any of the options if you choose to.
You will have the option of saving the profile at the end of the Spreadsheet Import Wizard, but it is not required. The selected profile was already saved and does not need to be saved again.