Step 1 - Download project from iCX
Login to icx with your username and password.
From your Dashboard, select the project you want to export:

Right Click on the word Items under the control number:
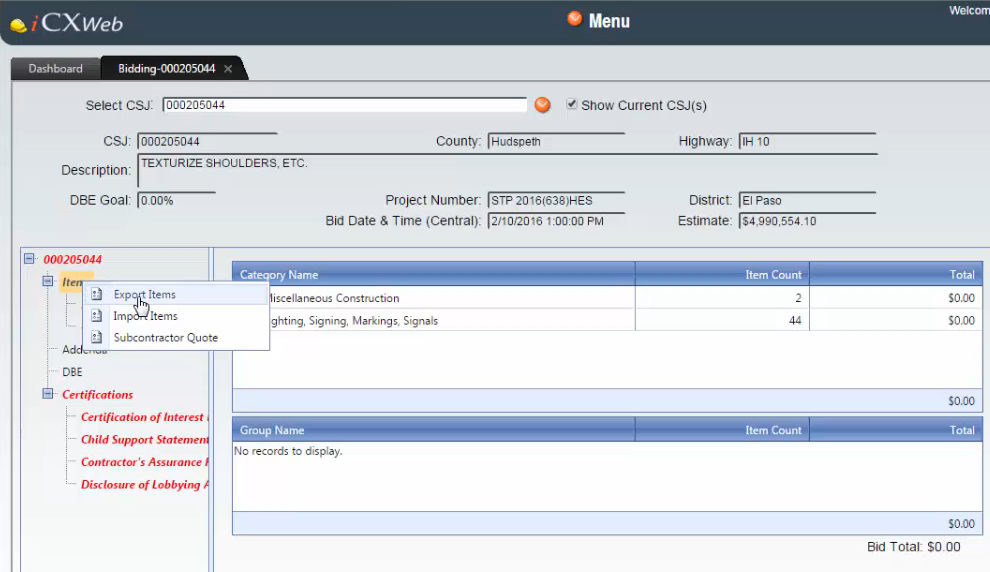
Select Export Items. A new window will be displayed:
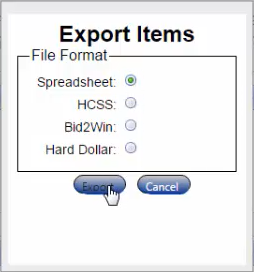
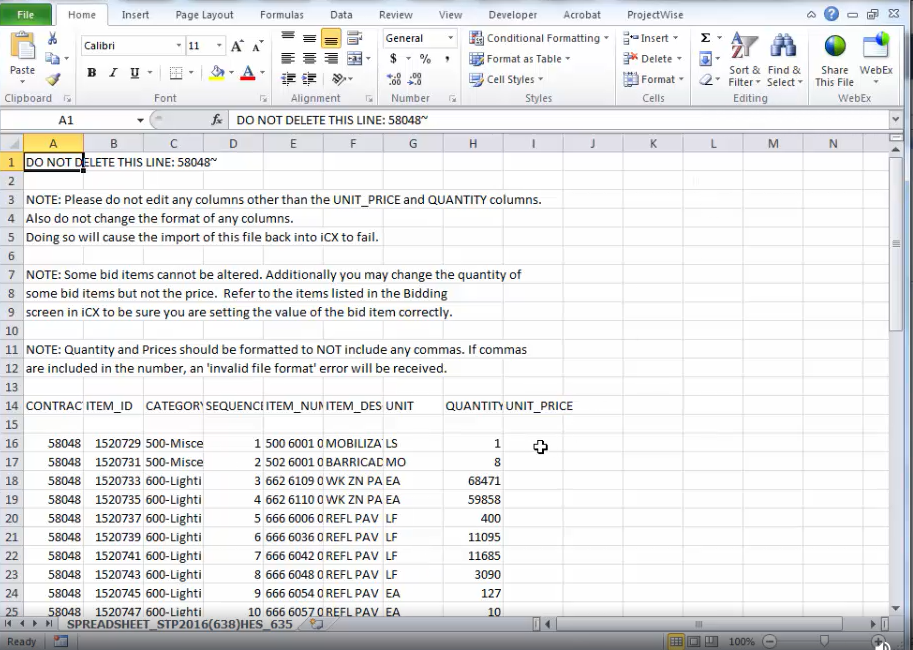
Select Spreadsheet and click Export. It will save to your default downloads folder. Your file should look like the below:
Step 2 - Modify Spreadsheet
Make a copy of this spreadsheet so you have the original.
Now you will want to modify the copy of your spreadsheet so that the Item headers are on top and there are no spaces in between the header and Items.
In the above example, you would delete rows 1-13 and row 15 so that your spreadsheet resembles the below:

Save and close the spreadsheet
Step 3 - Import into Estimating Link
Make sure that the spreadsheet you are importing is closed.
In Estimating Link, go to File > Import > Spreadsheet Import Wizard:

The Spreadsheet Import Wizard window will now be displayed:

Use the button with the 3 dots to choose the spreadsheet that you modified and click Next. The next window will appear:

Choose whether you are importing the data into the Current Project, a New Project or an existing Project and click Next. I chose current project as I had previous created a blank project to bring this data into. The next screen will appear:

Here you have the option to use a pre-existing map that you have created. I have not created one yet so I chose Don't use a profile, I will set the options up manually. You'll have the option to save the the map you create here to use on other imports on a future screen. Click Next.
The next window appears prompting you to select the type of data you are importing; Rates or Items:

Here, I chose Items since I'm importing Items from a state project. Click Next. The next screen appears prompting you to choose options that control how the data is imported:

I added a checkmark next to each. Click Next. On the next screen you can map your columns:

Note that you can have columns in your spreadsheet that you do not import into Estimating Link.
Here, I mapped ITEM_ID to my Item Number. I did this because on the project that I am importing, it has multiple Items that have the same Item Number. The Spreadsheet Wizard can only import one unique Item Number.
I still want to import my Item Number so I mapped that to Bid User 1 which is a user defined field on the Bid Sheet. Now I'll have the Item number as a reference.
To add a User defined field to the Bid Sheet, go to Setup > Options > Bid Sheet and add a User Defined field.
When you have everything mapped correctly, click Next. The next screen shows a preview of how the data will be brought into Estimating Link:

Everything looks correct, so I don't need to go back and modify my map. I do however want to save this profile so I don't have to map it every time I bring in similar data. To do this, I add a check next to Save Profile and title it iCX Map. Click Finish.
You will receive a success message that the Import is complete:
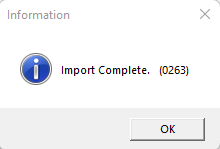
Click OK.
My project is now populated with the data from iCX:

If I want to reference the iCX Item Number, I can scroll to the right on the Bid Sheet and it will be in the last column.
If there are any Fixed Price Items, I can update my Item by right clicking on it on the Bid Sheet and selecting Alternate and Fixed Price > Fixed Price:

An F will now show next to the Bid Unit displaying that this Item is Fixed Price:
