Preview
Want to save yourself time and eliminate manual entry by interfacing your Quickbooks Desktop application to Estimating Link? Follow these instructions to set up your Estimating Link and Quickbooks applications to seamlessly integrate your estimating software to your accounting system!
What's included in this article:
Downloading and Installing the Interface File
Set up Quickbooks to prepare to connect with Estimating Link
Set up Estimating Link to prepare to connect with Quickbooks
Connect your Customers between Quickbooks and Estimating Link
Verify your Customers are synced between the two programs
Send your Estimates to Quickbooks
Step 1 - Download & Install the QB Interface file
- Login in to Estimating Link Downloads.
- Enter your CLI # and Password.
- Navigate to the Estimating Link Documentation section.
- Find the QBFC11_0Installer.exe and double click on the file to download the Estimating Link and QuickBooks interface file.
- Navigate to your downloaded file (in your downloads folder), find the QBFC11_0Installer.exe file. Double click on the file and follow the prompts to install the Interface.
- Your Interface between Quickbooks and Estimating Link is now ready to be set up.
Step 2 - Setup Quickbooks and Estimating Link to Interface.
⚠️Important: Both QuickBooks and Estimating Link have to be on the same workstation to use this procedure.
QuickBooks Setup
In QuickBooks, first make sure that Class Tracking is enabled. This option is under the Edit menu, in Preferences. Go to the Accounting section and then switch to the Company Preferences tab. Make sure “Use class tracking” and “Prompt to assign classes” are both turned on:

After you have verified that Class Tracking is enabled, close the Preferences window. Now go to Lists on the top main menu and select Class List:
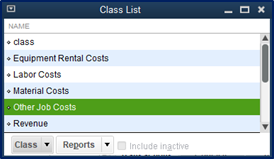
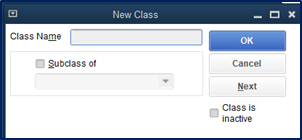
Look for a class named “New Construction”. If it does not exist, right-click and choose New and add “New Construction”:
You must also verify that a “Construction” account exists. Go to the Company menu and choose Chart of Accounts. Look for an account titled “Construction”:
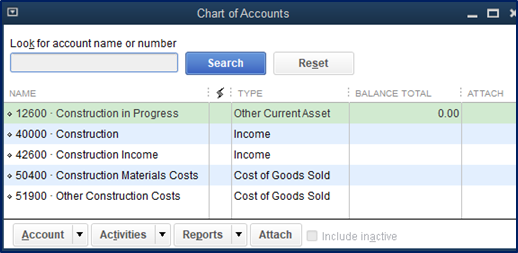
If a “Construction” account does not exist, right-click and choose New, and create the new account. The Type should be set to Income. You also have the option to change an existing construction income account name to "Construction." The name must be accurate. An account number is optional.
Estimating Link Setup
Ensure that you have QuickBooks enabled as your accounting system. Go to Setup > Options and choose the Accounting Tab. Check the box next to QuickBooks:

Step 3 - Connect your Quickbooks and Estimating Link Customers
Determine Which type of Setup you need:
Existing Quickbooks Users - Click Here for Instructions
New Quickbooks Users - Click Here for Instructions
Existing Quickbooks Users - Import Customer Data from Quickbooks to Estimating Link
Your Customer List in Estimating Link and Quickbooks must be synced before attempting to send a job to Quickbooks.
🗒️Note: Quickbooks must be open when performing this procedure.
To sync your Quickbooks Customers to Estimating Link, Select File > Import> Accounting > QuickBooks > Customer List:

The first time you make the connection from Estimating Link to Quickbooks, you will receive the following message in Quickbooks (You will need to switch back to the Quickbooks application):

You will need to click on one of the Yes selections to continue.
After clicking Yes, the following message will be displayed:

Click Yes. The next window will be displayed:

Click Done.
In Estimating Link, This message will display.

After the import is complete, this message will display.

Skip to the next step - Verify your Information.
New Quickbooks Users - Export Customer Data from Estimating Link to Quickbooks
Your Customer List in Estimating Link and Quickbooks must be synced before attempting to send a job to Quickbooks.
🗒️Note: Quickbooks must be open when performing this procedure.
To sync your Estimating Link Customers to Quickbooks, Select File > Export> Accounting > QuickBooks > Customer List:

This message will display. Click Yes.

The first time you make the connection from Estimating Link to Quickbooks, you will receive the following message in Quickbooks (You will need to switch back to the Quickbooks Application):
Click on Yes to continue.
After clicking Yes, the following message will be displayed:
Click Yes. The next window will be displayed:

Click Done.
In Estimating Link, this message will display while the information is being sent to Quickbooks:

After the export is complete, this message will display.

After the transfer, you will see the following display message in Quickbooks:

Verify your Information in Quickbooks and Estimating Link
You can check your customer lists in both Estimating Link and Quickbooks to ensure your customers are set up.
In Estimating Link, go to Setup>Customer Library. Your customers from Quickbooks will be displayed.

In QuickBooks, Go to the Customer Center, and your customer list displayed.

Step 4 – Send your Estimating Link Estimates to QuickBooks
Once the customer list is synced in Estimating Link and Quickbooks, you can export a job from Estimating Link into QuickBooks.
🗒️NOTE: Cloud Link users: Projects must be exported from Cloud Link and imported into Estimating Link desktop before proceeding.
⚠️ IMPORTANT: QuickBooks must be open, and a company file must be open or errors will occur.
- Open the project you want to send to Quickbooks.
Pre-Requisites for Projects before sending your project to Quickbooks
⚠️Warning: These Pre-requisites must be met or your estimate will not be created in Quickbooks!
Pre-requisite 1: A Customer has been associated to the Project
- Ensure the project has a customer associated to it. Go to File>Project Properties and check that the Customer has been associated to the project. Click OK when finished.

Pre-Requisite 2: The Project has been Rounded into Dollars & Cents
- Ensure the Project has been rounded into dollars and cents. If the project has not been rounded and you attempt to submit the project to Quickbooks, you will receive this message:

Pre-Requisite 3: The Project's Bid Items has an associated Unit Cost
- Ensure the project has a Unit Cost for each Item on the Bid sheet. This cost is mapped to the unit cost field in Quickbooks.

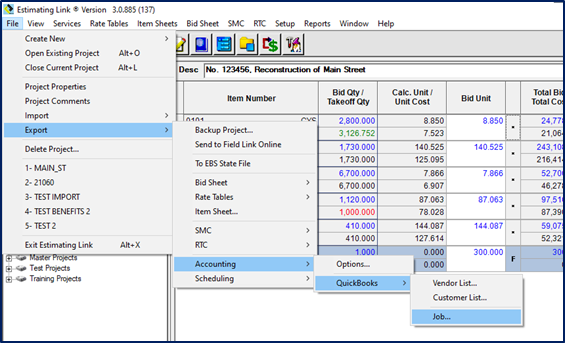
After verifying your Project is ready to be sent to Quickbooks, Go to File > Export > Accounting > QuickBooks > Job:
The transfer will begin. Larger Projects may take longer to export.

This message will be displayed. Click Yes.

🗒️Note: If Estimating Link takes a long time to send data to QuickBooks, switch to QuickBooks while it is exporting. You should be able to watch QuickBooks process the data being sent to it. You may also notice an authorization screen that needs to be accepted in QuickBooks before the data transfer will begin. The authorization screen does not always popup on top of all other windows, so you may need to switch to QuickBooks to see it.
When the project transfer to Quickbooks is complete, this message will be displayed:

Wrapping Up - Job Reporting in Quickbooks
The project will be displayed as an Estimate under your customer in Quickbooks.
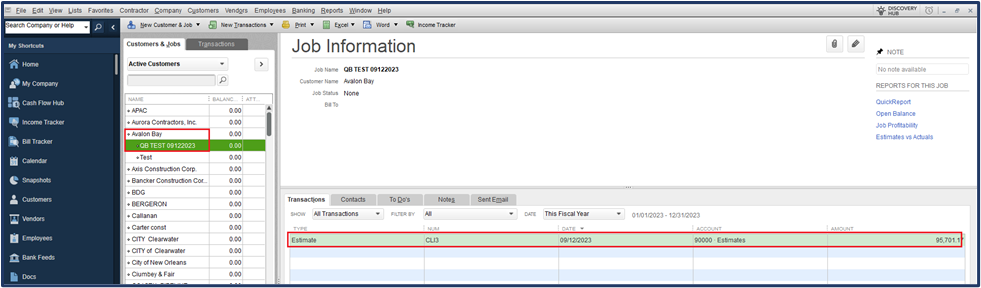
Double clicking on the Estimate in Job Information window will display the costs for each of the Project Items:

You will also find the Items from your project are now listed in you QuickBooks Item list:

🗒️Note: Quickbooks is not designed for job costing like other accounting software. Quickbooks allows you to job cost at the project level only. Therefore, each project will have it's only unique Item. Items from Estimating Link will be in this format: Item Number - Project Name.
When entering resource costs into QuickBooks you would use Enter Bills entry screen and post to the appropriate Item:

You can now display and print QuickBooks Reports, Contractor Reports to get project information:

Item Estimates vs. Actual:

Job Estimates Vs. Actuals Summary:

Mapping of Estimating Link fields to QuickBooks fields
If you would like to see what fields in Estimating Link are exported to QuickBooks and how it is mapped, please see: EL to QB Mapping