What is a Sub-Item?
A Sub-Item is defined as a smaller, more specific component or task that is part of a larger Primary item, known as a parent item, within the framework of a project breakdown.
🗒️Note: A Primary Item refers to the item listed on the Bid Sheet that will be presented to the customer. In contrast, a Sub-Item, also known as a Sub-Level Item, functions as a Child Item of this Primary Item and is not shown to the customer.
What is the difference between Sub-Item and a Combine Item?
The main distinction between Sub-Items and Combine Items lies in their usage: Combine Items can be utilized across multiple Primary Items and Sub-Items, while Sub-Items are exclusively linked to a specific Primary (parent) Item. For more information about Combined Items, click here.
When would I use a Sub-Item instead of a Combine Item?
A Sub-Item would be ideal when you have a larger task that consists of multiple smaller related tasks. These Sub-Items have their own costs and will roll up into the Primary item. Ex) Your primary Item is Foundation Work and your sub-items might include excavation, formwork, reinforcement, and concrete pouring.
Create Sub-Items using the Sub-Item Assistant
The Sub-Item Assistant allows you to create, browse, and modify Sub-Items used in your current project.
Accessing the Sub-Item Assistant
From the Bid Sheet or Item Sheet, click the blue table icon from your icon tray. You can also use the Service Menu and select "Sub-Item Assistant."
💡Tip: Hovering over the icons in the icon tray will give you a brief description of the icon's function.

The Sub-Item Assistant window will be displayed:
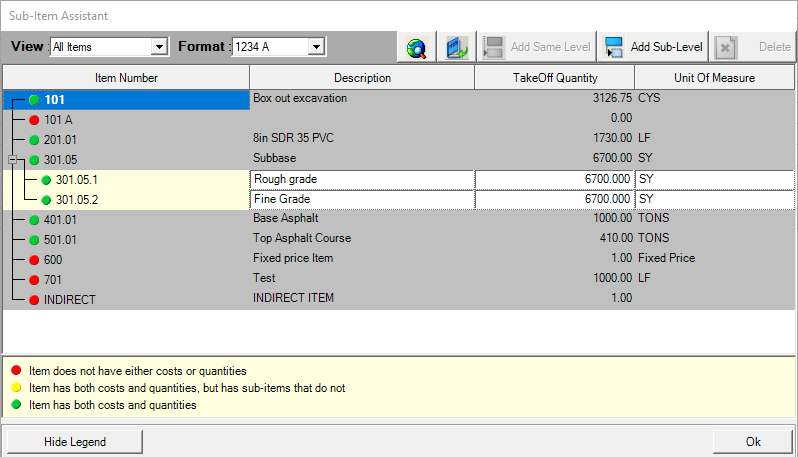
Sub-Item Assistant Window Details & Controls
- View - choose which Items you would like displayed
- All Items - view all Items (including Non Bid Items) in the current project
- Bid Items - view only Items that are on the Bid Sheet
- Format - choose which format you would like your Sub-Items to be:
- 1234 A
- 1234.1
- 1234.01
🗒️Note: If you previously added Sub-Items using a specific format, any new Sub-Items you create will automatically adopt that same format.
- Search Icon
 - Displays the Sub-Item Assistant Search. Here you can search for Items by entering text in the Search For field. To search for text that may be located in the middle of the text, start with an asterisk (*).
 - Go to Item Icon
 - Takes you to the Item Sheet of the currently selected Item and closes the Sub-Item Assistant.
- This is available for both sub-items as well as primary items.
- Add Same Level
 - Add a new Sub-Item at the same level as the currently selected Item.
- This will create a new sub-item at the same level as the currently selected sub-item. If you have sub-item "2.1" highlighted, then adding an item at the same level will create item "2.2".
- Add Sub-Level -
 - Create a new Sub-Item one level deeper than the currently selected Item.
- This creates a new sub-item to the currently highlighted sub-item. For example, if sub-item "2.1" is highlighted, the sub-item "2.1.1" is created within "2.1".
- Delete Icon -
 - Delete the currently selected Sub-Item.
- This will delete the selected Sub-Item and any connected Sub-Items below it.
💡Tip: Deleting a sub-item from the sub-item assistant will move the sub-item from the bid sheet and make it a non-bid item. If you have the Sub-Item Assistant View as "All Items", the sub-item you just "deleted" will still be displayed.
To completely delete the sub-item, find it in the non-bid items, right click on it, and delete it from the project.
If we can be of further assistance, please reach out to us at anytime: (800) 448 - 0741 or Support@TCLI.com.